
")
This is the fifth article in our series Going Digital With Genealogy. In this post I will show you how I create reports using Family Tree Maker. I talk about Family Tree maker since it is the Software that I have been using since 2012. Even though you may be using another program I highly recommend that read this post since you might get ideas as to what capabilities your genealogical software may have.

If you still don’t have a genealogy program I recommend that you get Family Tree Builder, it is a great starter program and it is free. But if you can afford it you can buy Family Tree Maker Deluxe with a free 3 month subscription to Ancestry.com for $59.00 at Amazon.com.
Before I go any further let me just remind you that genealogy reports/books are very important since they can help you easily see gaps in your research. They are also extremely useful to trade with other researchers. What I tend to do when I get a report on PDF format from another researcher is that I first archive it on my personal files. I then create a citation to it and reference my personal file collection as a repository for it. This is way easier than to be citing email after email or hundreds of pages at ancestry.com or any other website were the author may have had published it. This to me is one of the greatest reasons for handing out reports and always asking for one in return. You can just cite my report as being the source for the clues or information about your ancestors.
In my last post “Creating Genealogy Reports and or Books” I mentioned charts but did not emphasize the benefits of charts. Charts are the best way to provide a visual representation of your family tree. They can also guide you on your research since they provide you with an easy way to identify Gaps in your research. This charts can also be included into any book that you make but those are more advanced methods than the ones I will show you in this post.
For now I will only talk about the most useful reports that can be made into eBooks or eventually into printed books but that is a whole different topic that I will not cover in this post.
The reports that I am talking about are the Ahnentafel and Descendant Reports. To find these reports on Family Tree Maker just click on the icon labeled Publish on the top bar of the software. Once you click it you will be presented with all the charts that are available for yout o create. To the left hand side there is a column labeled “Publication Types”. In that column chose the second choice “Genealogy Reports”. There you will find both Ahnentafel and Descendant Reports. The Ahnentafel report is basically a report of ancestors for anyone you choose in your family tree and the Descendant report will give you a report of descendants for anyone you choose.
For this post just choose the Ahnentafel Report and to the right hand side chose where it says “Create Report”. We will use this report since it is the one that I most create to share with people since it shows all of my ancestors. Once you click there you will be taken to a screen that will have to columns, in one you will see a preview of the report that you are creating and in the other you have all the options to modify your report. If you have never used this before you will get default settings that are limited. Your report will be limited to about four or five generations, also no custom fields or citations are included.
Ahnentafel Report Options
In the column with the options to modify your report you have the following options. These options are almost the same for the Descendant Report.
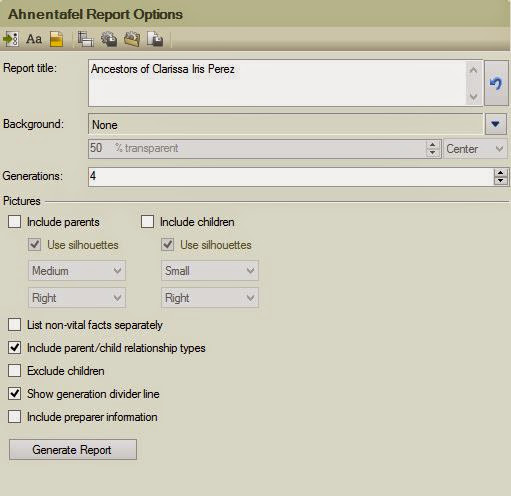
Report Title
Here you enter what ever name you want for your report.
Background
You can choose one if you want to go fancy but I have never used it since it makes your report harder to read.
Generations
This is where you choose how many generations you want included in your report. To print all of them just type about 30. Most people don’t have research that far back but if you are one of the exceptions just estimate a higher number.
Pictures
I you are printing only the last few generations and you have images for your ancestors you can also include this option. If there is no picture a silhouette will be made for them. I don’t like using this option.
List non-vital facts separately
Honestly I have never used this option but I believe it will list any other facts about your ancestors that you have.
Include parent/child relationship types
This will include the relationship next to the person’s name. I usually leave this out. Just bloats the report but if you like it go for it.
Show generation divider line
This will place a line separating generations easier to see int he report. I always use this option.
Include preparer information
This will place your information on the last page of your report. I use this option some times. If you are giving away your report to someone use this option so that they can use it to cite your report.
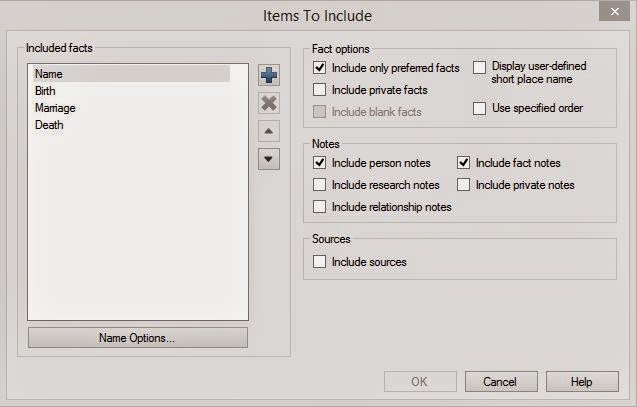
The above are the basic settings. Now lets get a bit technical. On the Report Options column there is a little icon with an arrow and three little circles. If you want to include more facts other than the vital ones that are presented by default that is were you would choose them by clicking on the plus sign. There you could also choose to include citations or not into your report and also if you want to add notes as well. See the following image.
Also on the same menu bar that you find the include more options icon there is an icon that is yellow and looks like a page. You can click it to include a header and footer for your report. You can also use that option to include page numbers in your report.
Once you have played around with all your options and or get the report to look how you want it to look just click on the “Generate Report” button.
Dont forget to save your report settings if you plan to come back and want the same settings again. Now that your report is ready lets print it, but as I mentioned before if you are planing to print it ot PDF you need to install a PDF printer first. Once you have it installed you would just select it.
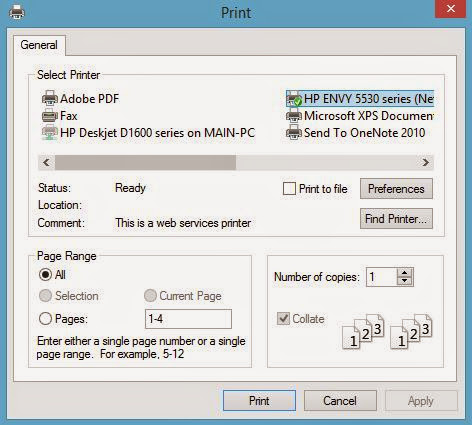
From the above image you can see that my default printer is HP Envy which would print my report to paper. Now to choose to print to PDF I will chose Adobe PDF since I have Adobe Acrobat (paid program). If you installed CutePDF (free program) you would have a printer listed as “CutePDF” and you would need to select it in order to make your PDF file. Once you have your PDF file you can start to send it to other researchers and or family.
Remember no matter which genealogical software you are using if it does not create PDF’s for you then use CutePDF or nay other PDF printer. Most computers come with one installed. Hope you found this post informative and let me just tell you that all Reports and Charts use almost the same settings on Family Tree Maker. If you use another program take the time to play with it and its chart and reporting capabilities. Most programs have the same features and or create similar reports.
In our next Going Digital With Genealogy series I will talk about A More Advanced Genealogy Book Maker, the one that I actually used to make my eBook. Any questions or ideas let me know in the comments section. I also would love to hear how it went creating your own reports. Remember if you need a free genealogy program I recommend that you start by using Family Tree Builder it is a great starter program and it is free. But if you can afford it you can buy Family Tree Maker Deluxe with a free 3 month subscription to Ancestry.com for $59.00 at Amazon.com.


Moises I tried downloading CutePDF but my anti virus would not allow it.